With the huge increase in working-from-home during the current pandemic, use of online meeting platforms has increased significantly. When the entire Citrix Cambridge team started working from home 4 weeks ago, we setup twice-daily virtual coffee rooms, using online meeting tools, to help keep staff connected. This social use of the technology – a use-case which has also seen rapid global uptake for virtual pub quizzes, virtual choirs, virtual religious gatherings, and so on – where most attendees are using webcams and aren’t being distracted by having to have an actual business meeting, is the perfect opportunity to play with the virtual background feature of some online meeting platforms.
A virtual background is a modification to the user’s webcam video stream where the software separates the foreground (the user) and the background, and allows the background to be replaced by a static image (or in some cases a video or other dynamic content). This feature is useful in a business context because it can help to remove distractions, and help other attendees to focus on a presenter; for example, a presenter may replace their background with a company logo. But in a social context it can create some great conversation-starters when attendees use vacation photos or other interesting material as their backgrounds. Several of our coffee room chats were like virtual world tours of colleagues’ previous travel destinations.
Beyond simple backgrounds
But you know I’m not going to be satisfied with a simple holiday snap background, right?
My first steps into more creative use of virtual backgrounds was to use an image of the (real) background from a colleague’s home office.
In this case I used a screen grab from a previous meeting and (badly) replaced my colleague (Christian) with a bunch of copy-and-paste blocks from nearby in the image. It’s better if you can get a clean image, e.g. if your colleague walks away to get a coffee, etc. I do have a library of such images opportunistically collected from recent meetings…
But that’s still just a static background image. Surely there’s more fun to be had.? It was time to enter the world of virtual webcams.
A virtual webcam is a piece of software that pretends to be a webcam in order for online meeting platforms, etc. to use it in place of a real webcam. Whatever video stream the virtual webcam generates, which could be entirely artificial, will be used in the meeting in exactly the same way as a real webcam. A simple use-case for some virtual webcam software is to perform basic background replacement when using an online meeting platform that doesn’t have that capability built in. If you have a Logitech webcam then Logitech Capture is a simple tool that can be used for this.
A commonly-used virtual webcam, that made a few appearances in our virtual coffee room sessions, is Snapchat’s Snap Camera. (You don’t need to be a Snapchat user to download and use this software.) This tool manipulates the output from a real webcam, using a library of Snapchat “Lenses” to transform the user into a variety of entities. One of the best known Lenses is the potato head – seen in a viral tweet where it appeared in a business meeting, but appeared in our virtual coffee room nearly a week prior to that.

Adding a second me to the meeting
Things get more interesting when virtual webcam software can combine webcam content with material sourced from other applications (by capturing the output of a window) or video files.
As I’ve been rambling on a bit already, let’s cut to the chase and see what I did:
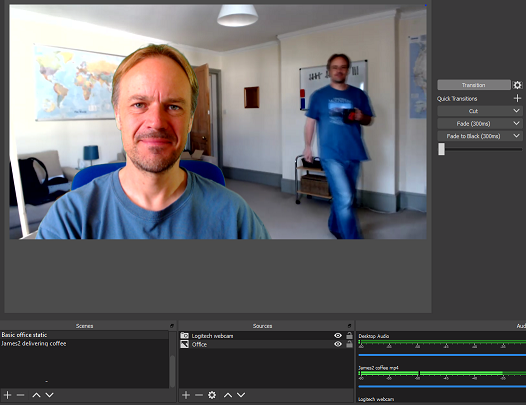
This is a video of me delivering a coffee (and later a beer) to myself, used as a background to the live webcam showing me sitting on the chair.
The video was recorded using the real webcam and Windows 10’s standard camera app. The video was trimmed to start just before I opened the door, and end once I exited the room. I took particular care to walk, and place the coffee mug where I new the real me wouldn’t be. The timing of the dialog was of course also carefully thought through.
To composite the video and live webcam I used the free/open-source OBS Studio. This very flexible piece of software creates what is effectively a TV-style vision and audio mixer which can take inputs from a wide variety of sources, and combine them in lots of different ways. Although OBS Studio is primarily designed for recording and for use with streaming services such as Twitch, it can also output to a virtual webcam (and thus be used for online meetings as I did here) using a suitable plug-in.
In OBS Studio I created a new scene and added the video as a Media Source (click the + button in the Sources dock. Selecting the video file, I deselected “Show nothing when playback ends” to ensure the background would pause once the video ended.

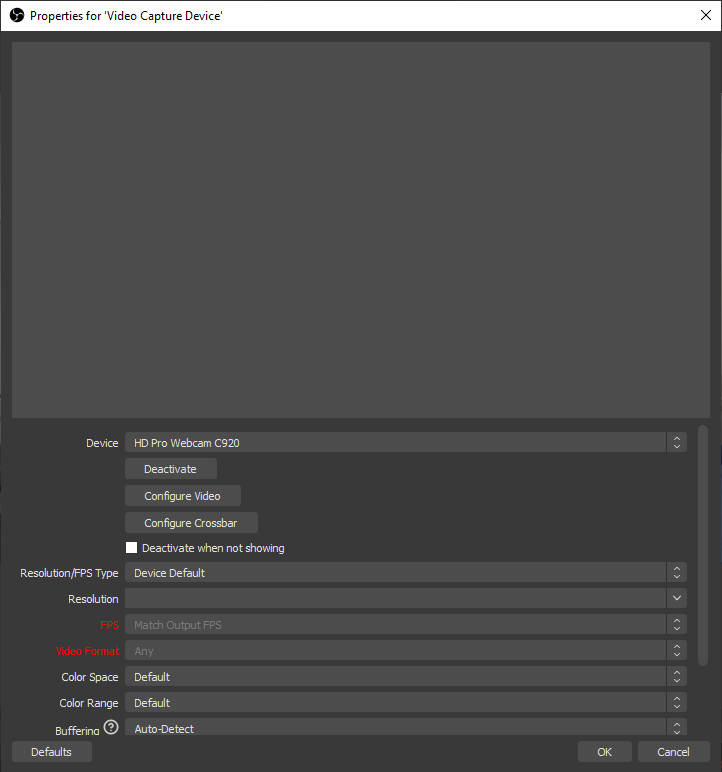
I then added a webcam capture on top of the media source. This is done by adding a Video Capture Device source and selecting your (real) webcam.
I should add at this point that OBS Studio isn’t a simple background-replacement tool. It’s not the easiest thing to use, and it doesn’t have a general background-removal function – rather it has a chromakey filter which can be used with a green screen background to remove the background in a similar manner to how it is done for a traditional TV weather forecast. The challenge with simple chromakey is that it can be tricky to get a clean separation between foreground and background; it’s common to see a green glow around the foreground (i.e. the person), bits of green screen not being properly filtered out, and bits of the foreground becoming see-through where they have been mistaken for green. There are loads of resources online about how to do chromakey well, so I won’t go into much detail here. Suffice to say that the key things I’ve learned are:
- Flood light the green screen well using as white a light as possible. I use two 30W LED floodlights.
- Pre-filter the webcam image to increase colour saturation to make the green greener, and non-greens, err, non-greener.
- Play with the chromakey settings, including chosing a key colour that is greener than the green you see in the webcam video – I found that this helped to reduce incidences of blues in my clothing from being removed.

In OBS Studio I used the Filters option for the webcam source (right click on it in the Sources dock) to: add a Crop/Pad filter to remove parts of the webcam image that were not covered by the green screen; a Color Correction filter; and a Chroma Key filter.
Here are screenshots of my settings for the colour correction and chromakey filters – note that these are specific to the lighting in my home office, the hue of my green screen, and the colours of my skin and clothing. Experimentation will be necessary to adjust these for other scenarios.


Putting these two sources together creates the desired effect. You’ll see in the next screenshot that I’ve moved the cropped webcam source (red outline) to the left to create space for the video version of me to place the coffee on the desk in the right of the frame.

An important consideration now is the audio. The virtual webcam doesn’t appear to have a useable audio source and therefore the online meeting platform will pull audio directly from a microphone (in my case it’s the mic built in to the Logitech c920 webcam). Therefore the audio from the virtual James in the video needs to be played out from the PC speakers for the mic to pick up. To do this I used OBS Studio’s audio monitoring feature. This required two settings: 1) configuring the Monitoring Device to be the PC speakers using the main settings dialog (File->Settings menu); 2) using Advanced Audio Properties dialog (from the Edit menu) to set the Audio Monitoring for the video source to be “Monitor and Output”. (There are probably better ways to do all of this audio routing, but this way worked well enough for my needs.)


All of this now means that as soon as you hit the “Transition” button to move this scene to the Program output (we’ve been working in the Preview window so far). You’ll see the video start and hopefully hear the audio from the speakers.
But we’re not quite done yet. What about the time before you want your virtual coffee delivered? When I first used this trick I solved this problem by editing the video to add a 10 minute long section to the beginning where nothing moved. However a better way is to create a second scene in OBS Studio which has a static version of the background, and use the scene transition functions to switch between the two. This lets you have your background video play on demand.
To do this I created a new scene by duplicating the current scene (this preserves the position of the webcam to allow a seamless transition – right click the scene in the Scenes dock and click Duplicate), removing the video Media Source and putting a static Image source in its place. To get a static image I played the video in a full-screen player and used the Print Screen button to get a screenshot at a time the video was showing a clean shot without me in it. I then saved this (using MS Paint) to a PNG file.

Now you can use the static image scene most of the time. When you want your coffee delivered, simply transition to the original video-based scene and it will start playing immediately. This means you can play the trick at exactly the time in the meeting that you want.
A final optimisation was to add keyboard shortcuts to enable transitioning between scenes without having to switch focus to the OBS window. This can be done via the File->Settings menu’s Hotkeys dialog. I chose to use keys on the numeric keypad to select each scene (this selects which scene will be transitioned to on the next transition) and to trigger the transition itself. There to switch to the static image I pressed ‘7’ then ‘+’; and to transition to the video-based scene I pressed ‘2’ followed by ‘+’.

So there we are – a fun way to entertain/troll your colleagues on a video conference. I’m already working on my next virtual webcam hack. Keep an eye out on Twitter…
